


You may have seen those pretty sparkly toppings that make cookies, cupcakes, and holiday treats shine if you like to bake. That is sanding sugar, a kind of sugar that is used to make baked goods look colorful and shiny.
What is sanding sugar, and how can you make it at home? Let’s look at what it is, how it’s different from other sugars, and the quickest way to make your own in just a few minutes.
What Is Sanding Sugar?
Sanding sugar is a decorative sugar made of larger, coarser crystals than regular granulated sugar. Its crystals reflect light, creating a sparkly, glitter-like effect on desserts.
It’s commonly used for:
- Decorating cookies, cupcakes, and pastries
- Adding shimmer to candies and chocolates
- Rimming glasses for festive drinks
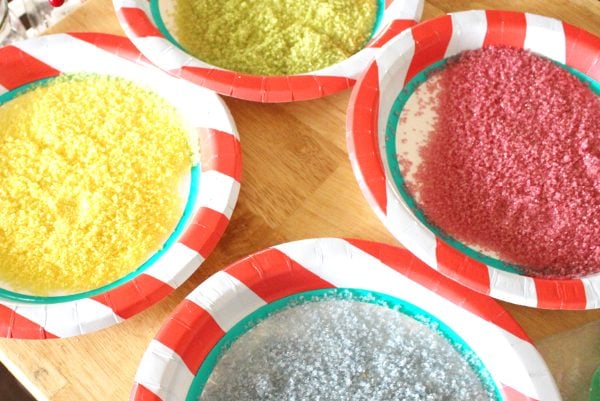
Because sanding sugar doesn’t melt easily when baked, it retains its shine even after coming out of the oven — making it perfect for bakers and home decorators alike.
Sanding Sugar vs. Regular Sugar
| Feature | Sanding Sugar | Granulated Sugar |
| Crystal Size | Larger, coarse | Fine |
| Appearance | Sparkly, translucent | Matte white |
| Melting Point | High (resists melting) | Low |
| Main Use | Decoration | Sweetening |
| Available Colors | Multi-colored | White only |
Is Sanding Sugar Edible Glitter?
No, sanding sugar is not edible glitter.
- Edible glitter is made from fine mineral powders, offering a mirror-like shine but is hard to make at home.
- Sanding sugar is simply sugar colored with edible dye — totally safe, easy to make, and 100% edible.
So if you’re looking for a homemade, food-safe alternative to edible glitter, sanding sugar is the perfect option.
How to make Sanding Sugar at Home?
Homemade sanding sugar is:
- Cost-effective — only needs sugar and food coloring
- Customizable — create any color you want
- Fun and fast — takes less than 15 minutes
Plus, you’ll always have fresh decorative sugar ready for cookies, cakes, and drinks.
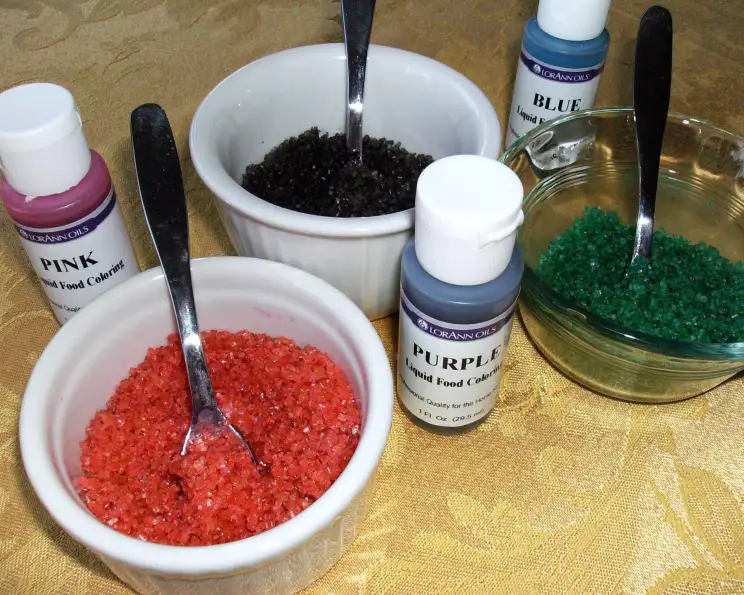
Ingredients You’ll Need
- 1 cup granulated sugar
- Gel food coloring (any color of choice)
That’s it! No cornstarch, alcohol, or special sprays required.
Equipment
- Food processor (optional)
- Parchment paper
- Baking sheet
- Zip-top bag (if not using a processor)
- Sifter and bowls
How to Make Sanding Sugar (2 Easy Methods)
Method 1: With a Food Processor
- Preheat oven to 250°F (120°C).
- Add sugar to a food processor.
- Add one drop of gel food coloring.
- Blend for 30–45 seconds until evenly colored.
- Spread on a parchment-lined baking sheet.
- Bake for 10 minutes, then cool for 15.
Method 2: Without a Food Processor
- Add sugar to a zip-top bag.
- Add a drop of gel coloring.
- Seal and squish the bag to mix color evenly.
- Pour sugar into a sifter over a bowl; remove clumps.
- Spread on a baking sheet and bake for 10 minutes.
- Cool for 15 minutes before using.
How to Store Sanding Sugar
Store your colored sugar in:
- Airtight containers
- Mason jars
- Zip-lock bags
Keep it in a cool, dry place — it lasts for several months without clumping.
Creative Ways to Use Sanding Sugar
- Sprinkle over cookies and cupcakes before baking
- Decorate donuts, candies, or cake pops
- Add sparkle to cocktail rims or mocktails
- Dust over holiday treats for color and shine
- Add to gift jars or edible craft projects with kids
FAQs About Sanding Sugar
1. Can I use regular sugar instead of sanding sugar?
You can, but it won’t look as sparkly or hold up under heat. Sanding sugar’s coarse texture gives desserts their signature shine.
2. What food coloring works best?
Gel food coloring works best because it blends evenly without melting the sugar.
3. Does sanding sugar melt when baked?
No, that’s what makes it special! It keeps its shimmer and texture even after baking.
4. How long does homemade sanding sugar last?
If stored in an airtight container, it can last up to six months.
Final Thoughts
Sanding sugar is a simple yet magical ingredient that transforms any dessert into a showstopper. Whether you’re baking holiday cookies or decorating cupcakes, making your own colored sugar at home is easy, fun, and creative.
Give it a try, experiment with colors, and make your sweets sparkle — literally!
Read More: Pumpkin Chiffon Pie Recipe